Wednesday, September 9, 2009

An Ode to Bakelite

Bakelite radio from the 1940's

I've always tried to be discerning about the materials I am willing to work with. I have turned down commissions where lucite stems were requested, and I tend to eschew the ornate--adornments, multiple stem flourishes, and pipe "jewelry" of any sort. I really prefer for line, shape, and proportion to do most of the talking, but recently I have become completely smitten by a "new" material . . . bakelite


A beautiful translucent bakelite watch circa 1930

In actuality, though, bakelite is not new at all. It was invented in 1907 by a Belgian immigrant to the US named Leo Bakeland. In 1927, Bakeland's patent on the chemical composition of the material expired, opening the door to other manufacturers as well as myriad uses. In the 20's and 30's bakelite was used in the manufacture of records, cameras, telephone receivers, steering wheels and shift knobs, spectacles (that's what they called glasses way back when ), and any number of other products. Throughout the 40's, 50's and 60's it fed the American consumerist boom, employed in items such as poker chips, radios, children's toys, travel razors, electric irons, billiard balls, and especially jewelry. Because of its strength and beauty--it could easily be colored to suit any preference--bakelite began to replace steel and wood as the product of choice in numerous arenas. It was dubbed the "material of a thousand uses." 


Bakelite bangles from the 40's. This shows the marvelous array of colors in which bakelite was produced.

Bakelite is now highly collectible with some mid-century radios fetching upwards of $10,000 USD. Despite its ubiquity throughout a fair portion of the 20th century, bakelite has become quite rare, and highly collectible. For my purposes--namely pipe stems and decorative rings--it is even more so. Sourcing antique bakelite rod can be very difficult. When you can find it, it is often cracked, occasionally inauthentic, and always obscenely expensive. It is also very difficult to work with. It gums up and dulls tools quicker than anything I've ever seen, and can be very difficult to bend. The color is unpredictable--the outside of the rod may be brown and the inside lilac--so you can't always know what you've got until you cut into it. 

Despite all these drawbacks, however, I really love the stuff. Nothing else is as creamy and smooth when finished. It plays with light brilliantly, even the opaque material going slightly translucent at the edges. It also meets all of my criteria for inclusion on a high grade pipe--it is rare, expensive, requires great skill to work with, and has no equal amongst cheaper commercially available materials such as lucite. I've always been a sucker for things vintage, and bakelite is no exception. Look for much more of this beautiful material coming from my workshop.


Lovely hexagonal toffee bakelite stem on what I've dubbed the Machinist's Dublin

Blasted Matador with jade hemisphere saddle 

An array of colors from ivory to deep green

Crimson and gold bakelite on this Deco-Fish

Playing with light, this seaweed bakelite stem goes translucent at its thinnest points.

Wednesday, July 8, 2009

Inspiration

On the Mediterranean in Arma di Taggia, Italy

Inspiration can come from anywhere--nature, music, literature, art. For those who create, the world is a fascinating and inspiring place, fraught with new possibilities and new potential. 


A view of the Tuscan countryside off the piazza at our villa, Rufena


The main house on the grounds at Rufena

As most of you know, I recently traveled to Italy for a party that my briar cutter Mimmo was throwing for his father Fillipo. It was great fun and I'll post photos and a rundown of things to my blog sometime later in the week. Before traveling to Taggia, though, we spent a week in Tuscany at a private villa owned by a friend. It's a 15th Century villa situated in the Chianti region and sits amidst acres and acres of pristine vineyards. Tiny villages dot the hillsides, and it is a region of rugged and pristine beauty like few places I've ever seen. The vistas from Rufena--as our villa has been called for at least a century--were simply remarkable. The air is perfumed by the sweet smell of lavender honeysuckle and rose bushes that look to be at last a hundred years old. It should come as no surprise then, that I was absolutely inspired . . . by one of the toilets!

Yes, it's true, the bathrooms had just been redone and one in particular incorporated very modern design elements into an otherwise classically Tuscan style. The bidet, specifically, had beautiful lines and I decided then and there to recreate it as a pipe. Is it a good idea to make known the humble sources of my inspiration for this piece? I don't rightly know, but I can only say I am very pleased with the way it turned out.  


This piece is SOLD for $595USD


Monday, April 20, 2009

Evolution of a Calabash or Why High-Grade Pipes are Expensive

Choosing a block
Laying out the pipe in the block by plotting the bowl diameter.
Ready to mount in the 2-jaw chuck.
Before turning the top of the bowl on the lathe, a ring needs to be made that will be inserted into the top of the bowl. The ring will serve as a "mortise" for the bowl insert.
The ring has been turned, polished, and cut off.
The briar portion of the bowl insert must now be turned.
Flipped around in the lathe, the tobacco chamber is now bored. I prefer to use a boring bit on the tool post rather than an S & D or spade bit in the tailstock. It creates a cleaner cut and I can control the wall thickness more easily by turning the outer profile of the bowl in accordance with the profile the chamber will have.
Here you see that the top of the bowl has been cut, a shoulder cut to receive the ring. The depth has to be precise so that the top remains flush. 

Once the top of the bowl has been turned and the ring fit, everything else is done completely by hand. Here I'm beginning to shape the pipe on the 36 grit wheel.
The bottom profile is the first to emerge.
More material has been removed and the pipe is beginning to take shape.
The symmetry of the pipe must constantly be checked.
The pipe now has its final rough shape and is ready to be drilled.
Here I've already drilled the mortise and draft hole by hand. I will drill one small hole through the bowl where the expansion chamber will eventually be. This hole must intersect the draft hole precisely so that the expansion chamber can be routed out later.
At this point, the holes are connected, but the expansion chamber must be routed out by hand making sure to keep the wall thickness even and allow enough room for the bowl insert to slide in without touching the chamber at any point.
Here the expansion chamber has been completely routed out and is ready to receive the bowl insert.
Now the bowl insert must have a dome. For this piece, I've chosen Zebrawood.
The blank for the dome is roughed out on the shaping wheel so that it can be held in the lathe's 3-jaw chuck.
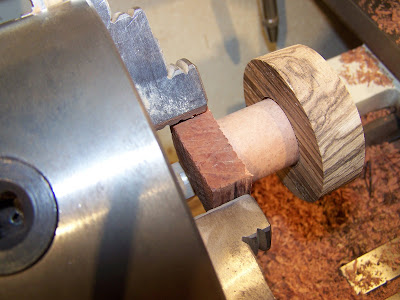
With the blank in the lathe, I can now turn the inset for the dome to receive the briar bowl. Note that it must have a small inset shoulder so that the collar on the bowl insert is inset rather than laying on the face of the dome's underside. Again, the measurements must be within a couple thousandths so that the bowl insert contacts the face of both steps.
Here's a close-up of the inset shoulder.
Now the briar insert can be dry fit into the Zebrawood.
At this point, a mandrel must be turned for the Zebrawood blank. It cannot be held in the chuck for turning. Items such as this mandrel are throw-away's. They are essentially one-off tools that have to be made during the creation process. Perhaps this will end up as a tool handle somewhere down the road, but it has no function with respect to the pipe itself.
Here the Zebrawood is mounted on the mandrel and can now be turned to shape, sanded, stabilized, sanded some more, and polished.
The 13/16" chamber diameter must be matched exactly and will be created with a plunge-cut from the tool post.
Here the dome has been turned to shape and the plunge cut is being made. If it is even a millimeter too large, the process has to start over again or the bowl insert will have a "step" when the two are joined.
The finished Zebrawood dome.
Here, the briar bowl insert, and Zebrawood dome are dry-fit into the Calabash stummel.
A close up of the three elements.

Now the stem must be cut. No "golden ratios" or exact measurements are used to determine the length of the stem. The best tool here is an experienced eye.
Here, the dome on the stem is turned, and the rod stock is drilled for its delrin tenon. It will also get a tapered draft hole at this point.
Here the blank is fitted to the stummel.
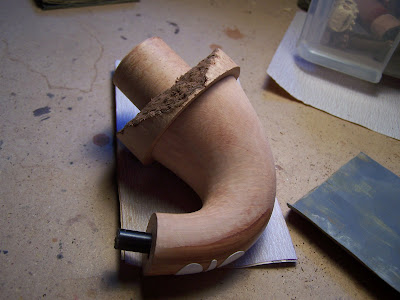
The stem has now been rough shaped on the 36 grit wheel.
Another shot.
Now the stem must be filed, sanded, and polished.
Here the fit is being tested.
Now the stummel is almost ready to be blasted. I never use tape to mask the top for the simple reason that an edge can pull up during the blasting process. This can ruin the finish of the entire piece. Instead, I turn a "plug" to insert into the expansion chamber and mask the top during the blasting process.
This is the "donut" that will fit down over the plug and protect the top of the pipe during the blasting process.
The finished plug--another "throw away."
Here's the pipe wearing its funny hat and with a delrin plug in the mortise. The shank will be refaced after the pipe has been blasted.
Before blasting, the pipe is taken down to 320 grit on the wheel.
Now its shank is polished and masked for stamping. Ready to blast!
Here the pipe has been blasted for depth.
Look at those rings!
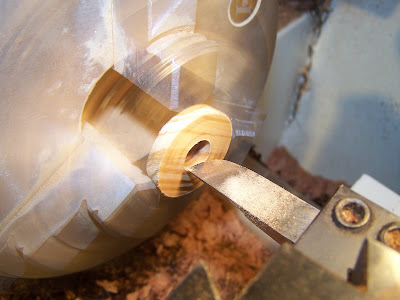
Now it's time to cut the Zebrawood shank ring.
The ring also has to be sanded, stabilized, sanded again, and polished while on the lathe.
Here's a shot of the pipe with everything dry fit.

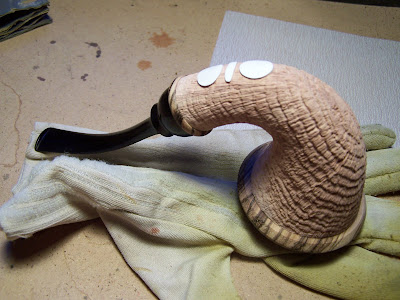
Here the pipe has been blasted for detail. Notice the way the rings stand out in sharp relief.

Now the stem is bent and the pipe takes its final shape.
The elements of the bowl will be fit together, adhered, and then finished.
Here the pipe has received its understain.
Note that the stem inserted into the pipe is just a handle. 
Now the pipe receives its "overstain," a coat of black.
Another close up.
The top of the bowl is smooth and will be finished in high contrast.
After the black has been sanded off.
Now the lighter stain can go over top and the top can be polished and waxed.
The masking is removed and the pipe can now be stamped.
Here she is in all her glory.
Ring-grain anyone?
And another . . . 
And one more for good measure. 


And THAT is why high-grade pipes are expensive!